Project 4: Numc
Overview
Due Wednesday, December 4th
This project is designed to be both a C project as well as a performance project. In this project you will be implementing a slower version of numpy. Your version of numpy, numc (how exciting!), is most likely to be slower than numpy, but much faster than the naive implementations of matrix operations. You will first complete a naive solution for some matrix functions in C, then you will experiment with the setup file in Python to install your numc module. After that, you will gain a deeper understanding of the Python-C interface by overloading some operators and defining some instance methods for numc.Matrix objects. Finally, you will speed up your naive solution, thus making numc.Matrix operations faster.
Do not expect your final completed numc module to be as good as numpy, but you should expect a very large speedup compared to the naive solution, especially for matrix multiplication and exponentiation!
Tips and Guidelines
Here is a list of all the important clarifications!! For each new clarification we make, it will be reflected both in that post and the spec.
- Please start early! Because there are many more 61C students than Hive machines, you will likely share resources with your classmates. This might affect the measurement of your code’s speedup. We encourage you to use Hivemind to help balance the load amongst the hive machines.
- You will have 6 tokens every 24 hours for the Gradescope assignment.
- You can complete task 1 through 3 before the performance lectures (lec 33-35) and task 4 after. So again, please start early!
- You will get negative points up to the number of points it is worth if you fail to complete task 5, so you should do it as much as you can even if you do not complete the entire project!
- You can either allocate new matrices and throw errors in
numc.cormatrix.c. - We will not be directly testing your C code. All tests will be in Python!
- You may change the function signatures in
matrix.handmatrix.cas you deem appropriate, but you may not change the function signatures innumc.handnumc.c. - You may change the skeleton code in
numc.c. - You may NOT add/remove any additional imports.
- If you would like to run the reference solution to compare your solution to, you can import the
dumbpylibrary on hive as we have already installed it there for you! - For this project, we strongly suggest working on Hive machines under you cs61c account. We have set up a few environment settings that only work if you use your cs61c account.
Getting Started
Ssh into one of the hive machines under your cs61c class account.
Please follow the directions in this Google Form to get a repository: https://docs.google.com/forms/d/e/1FAIpQLSc59h0HsJLPfhqbJ8hil01lrfIvK0xTPxTihB1C3KfpmkGc2Q/viewform. After completing the form, clone your GitHub Classroom repository and add the starter code repository as a remote:
$ git clone YOUR_REPO_NAME
$ cd YOUR_REPO_NAME
$ git remote add starter https://github.com/61c-teach/fa20-proj4-starter.git
If we publish changes to the starter code, retrieve them using git pull starter master.
To be able install the modules that you will complete in this project, you must create a virtual environment with by running
$ python3.6 -m venv .venv
Note that you MUST use python 3.6 as our reference module dumbpy only supports this specific version of python. Finally, run the following command to activate the virtual environment:
$ source .venv/bin/activate
This will put you in a virtual environment needed for this project. Please remember that if you exit the virtual environment and want to return to work on the project, you must re-run source .venv/bin/activate. This also means every time you re-ssh into the hive, you will have to re-run source .venv/bin/activate.
Then, run
pip3 install -r requirements.txt
in the virtual environment. This will install all python packages you need for running your custom python tests.
Finally, if you have to exit out of the virtual environment, you can do so by running:
We already have the reference library dumbpy installed for you on Hive machines. You can import it with or without the virtual environment while using python3.6, and all object and function names are the same as the numc module that you will implement (please refer to Task 3). You will only be able to access the dumbpy package on hive as we will not be directly releasing it. You can use it as a reference for both correctness and speed.
Again, for this project, we strongly suggest working on Hive machines in your cs61c class account. You will not be able to import dumbpy if you are using other class accounts. We may be unable to help you with issues caused by working outside of the Hive.
Task 1: Matrix functions in C
For this task, you will need to complete all functions in matrix.c labelled with /* TODO: YOUR CODE HERE */. The comments above each function signature in matrix.c contain instructions on how to implement the functions, so read them carefully before you start coding.
The matrix struct is defined in matrix.h. Feel free to change it, but make sure your changes are compatible with our starter code.
typedef struct matrix {
  int rows;       // number of rows
  int cols;       // number of columns
  double **data;  // each element is a pointer to a row of data
  int is_1d;      // Whether this matrix is a 1d matrix
                  // For 1D matrix, shape is (rows * cols)
  int ref_cnt;
  struct matrix *parent;
} matrix;
rows is the number of rows of this matrix, cols is the number of columns, and data is a 2D representation of the matrix data. ref_cnt is the number of existing matrix structs (including itself) that share all or part of the data array with this particular matrix struct. is_1d is non-zero if the number of rows is 1 or the number of columns is 1. parent indicates whether this matrix struct is a slice of another matrix, and should be set to its parent matrix struct if it is and NULL otherwise.
matrix.h also imports the library Python.h, but for this part you should not need any other functions besides PyErr_SetString.
Depending on your implementation of matrix.c and numc.c, you may or may not assume that result is already preallocated or that all inputs’ dimensions are valid. However, as mentioned in the Tips and Guidelines section, your Python number methods will need to handle the case where matrix allocation fails.
Again, you may change any function signature in matrix.h and matrix.c.
Important notes:
- Remember to throw a runtime error if
allocate_matrixorallocate_matrix_reffails to allocate space, or a value error if you are trying to allocate matrices with non-positive dimensions! Otherwise you would have to make sure that a runtime/value error will be thrown innumc.cwhenever we run out of memory. This includes throwing an error in Matrix61c_init. - Remember to set the
is_1dfield when initializing matrices inallocate_matrixorallocate_matrix_ref!. Since 1D matrices are printed out differently than 2D, autograder tests may fail ifis_1dis not set correctly. - The
deallocatefunction as well as theref_cntfield in thematrixstruct have caused a lot of confusions in the past semesters. It is important to remember that thisref_cntis NOT Python’s internal reference count. It is simply a field that will help you implement thedeallocatefunction. It does not have to reflect the true reference count if you deem that setting it to other values will simplify your implementation ofdeallocate. - For the
deallocatefunction, since there can be multiple matrices that refer to the same data array in the memory, you must not free the data until you calldeallocateon the last existing matrix that refers to that data. If you are having some difficulties implementing this, here’s a hint: you can keep the matrix struct in the memory even if you have already calleddeallocateon that matrix. You only need to make sure to that the struct is freed once the last matrix referring to its data is deallocated.- If this explanation does not make sense now, don’t worry! It will make more sense after you implement the indexing section of task 3.
Testing for Correctness
We’ve provided some sanity in mat_test.c. These tests make several assumptions:
- They assume that all result matrices are already pre-allocated with the correct dimensions and that all input dimensions are valid.
- They assume that you have not modified the
matrixstruct inmatrix.h - All tests except the tests for
getandsetassume that yourgetandsetare correct - They assume that you have not modified the function signatures.
Violation of one or more of these assumptions may not cause your tests to fail, but please keep this in mind if your tests are failing and you are violating at least one of these assumptions.
To run the CUnit tests, run
in the root folder of your project. This will create an executable called test in the root folder and run it.
By default, CUnit will run these tests in Normal mode. When debugging a specific issue, it may be helpful to switch to Verbose mode, which can be done by commenting and uncommenting the relevant lines in mat_test.c:
// CU_basic_set_mode(CU_BRM_NORMAL);
CU_basic_set_mode(CU_BRM_VERBOSE);
Make sure that one line is uncommented at a time.
Please keep in mind that these tests are not comprehensive, and passing all the sanity tests does not necessarily mean your implementation is correct. This is especially true with the memory functions allocate_matrix, allocate_matrix_ref, and deallocate_matrix. Also keep in mind that the autograder will be using our own set of sanity tests. We will not directly test your C code, and will not be running your CUnit tests.
Another thing to note is that the Makefile is written for compilation on the hive machines. If you wish to run it locally, you will have to modify the Makefile by replacing the path to your CUnit/Python libraries in your CUNIT and PYTHON variables. You will also need to make sure that your local computer supports AVX extensions and OpenMP.
Finally, you are welcomed to modify mat_test.c to implement your custom test cases.
Task 2: Writing the setup file
The setup.py file is used for installing your custom-built modules. After completing it, you should be able to install numc by simply running:
This will uninstall your previously installed numc module if it existed and reinstall numc. We have written numc.c so that numc.Matrix will be initialized and ready to import upon succesful installation of the numc module. You should rerun make every time you make changes and want them to be reflected in the numc module.
You can uninstall your numc module by running
We have provided you with the compiler and linker flags in setup.py, and your task is to find out how to use them to build your module.
You will likely get a lot of warnings about functions being defined but not used, and that’s ok! You should ignore these warnings for now, and they will be gone after you finish writing Task 3.
Remember that you must be in the virtual environment that you set up in order to install the modules, otherwise you will get a “Read-only file system” error.
READ FIRST: take a look at the function distutils.core.setup (https://docs.python.org/3.6/distutils/apiref.html), and here is an example usage. If the documentation seems too difficult to understand, it is a good idea to take a look at the example first. You only need two function calls to complete this section, if you’re doing more than that, please reread the docs included as you’re likely doing something wrong
Task 3: Writing the Python-C interface
Now that you have successfully installed your numc module, you can import your numc.Matrix objects in Python programs! Here are some ready-to-use features already implemented for numc.Matrix objects. You might find them helpful when debugging Task 3.
Info: Importing numc.Matrix
Here are several ways of importing numc.Matrix
from numc import Matrix

import numc
numc.Matrix

import numc as nc
nc.Matrix
Info: numc.Matrix initialization
Here are all the different ways of creating a numc.Matrix object.
>>> import numc as nc
CS61C Fall 2020 Project 4: numc imported!
>>> nc.Matrix(3, 3) # This creates a 3 * 3 matrix with entries all zeros
[[0.0, 0.0, 0.0], [0.0, 0.0, 0.0], [0.0, 0.0, 0.0]]
>>> nc.Matrix(3, 3, 1) # This creates a 3 * 3 matrix with entries all ones
[[1.0, 1.0, 1.0], [1.0, 1.0, 1.0], [1.0, 1.0, 1.0]]
>>> nc.Matrix([[1, 2, 3], [4, 5, 6]]) # This creates a 2 * 3 matrix with first row 1, 2, 3, second row 4, 5, 6
[[1.0, 2.0, 3.0], [4.0, 5.0, 6.0]]
>>> nc.Matrix(1, 2, [4, 5]) # This creates a 1 * 2 matrix with entries 4, 5
[4.0, 5.0]
More specifically:
nc.Matrix(rows: int, cols: int)will create a matrix withrowsrows andcolscols. All entries in this matrix are defaulted to 0.nc.Matrix(rows: int, cols: int, val: float/int)will create a matrix withrowsrows andcolscols. All entries in this matrix will be initialized toval.nc.Matrix(rows: int, cols: int, lst: List[int/float])will create a matrix withrowsrows andcolscols.lstmust have lengthrows * cols, and entries of the matrix will be initialized to values oflstin a row-major order.nc.Matrix(lst: List[List[int/float]])will create a matrix with the same shape as the 2Dlst(i.e. each list inlstis a row for this matrix).
Info: instance attributes
The matrices and vectors have an attribute shape. For a 2D matrix, it is a tuple of (rows, cols). For a 1D matrix, it is a one-element tuple of (number of elements, ) Example is given below.
>>> import numc as nc
CS61C Fall 2020 Project 4: numc imported!
>>> mat = nc.Matrix(3, 3)
>>> mat.shape
(3, 3)
>>> mat = nc.Matrix(3, 1)
>>> mat.shape
(3,)
Because 1D matrices’ shapes are tricky, we are NOT testing matrix operations on your 1D matrices.
Info: Python/C API Reference
Here is the link to the full reference manual: https://docs.python.org/3.6/c-api/index.html. If you ever find anything confusing in the skeleton code or are at a lost on how to implement numc.c, this is a great resource.
Quick Overview of numc skeleton code
We define the Matrix61c struct in numc.h. It is of type PyObject (this means you can always cast Matrix61c to PyObject, but not vice versa), which according to the official documentation, “contains the information Python needs to treat a pointer to an object as an object”. Our Matrix61c has the matrix struct we defined in matrix.h.
Then we define a struct PyTypeObject named Matrix61cType to specify the intended behaviors of our Python object Matrix61c. This struct will then be initialized to be our numc.Matrix objects.
static PyTypeObject Matrix61cType = {
    PyVarObject_HEAD_INIT(NULL, 0)
    .tp_name = "numc.Matrix",
    .tp_basicsize = sizeof(Matrix61c),
    .tp_dealloc = (destructor)Matrix61c_dealloc,
    .tp_repr = (reprfunc)Matrix61c_repr,
    .tp_as_number = &Matrix61c_as_number,
    .tp_flags = Py_TPFLAGS_DEFAULT |
        Py_TPFLAGS_BASETYPE,
    .tp_doc = "numc.Matrix objects",
    .tp_methods = Matrix61c_methods,
    .tp_members = Matrix61c_members,
    .tp_as_mapping = &Matrix61c_mapping,
    .tp_init = (initproc)Matrix61c_init,
    .tp_new = Matrix61c_new
};
For example, .tp_dealloc tells Python which function to call to destroy a numc.Matrix object when its reference count becomes 0, and .tp_members tells Python what instance attributes numc.Matrix objects have. You can take a look at the official documentation if you are curious.
Useful functions:
Here is a list of some functions and Python objects from <Python.h> that you may find useful. You can also choose any other functions at this link.
Now you are ready to complete numc.c, the Python-C interface! As before, you will need to fill out all functions and variables labeled /* TODO: YOUR CODE HERE */. The code for initializing the module numc and the object type numc.Matrix is already done for you. Although not required, we encourage you to take a look at the existing code to better understand the interface.
Below are the three main parts for this task.
Note: For each of the function below, we specify when you should throw each type of error. For any errors not specified, throw a runtime error.
Number Methods
For this part, we ask you to overload operators for numc.Matrix objects. Here are the expected behaviors of overloaded operators:
a + b: Element-wise sum ofaandb. Returns anumc.Matrixobject.- Throwing errors:
TypeErrorifbis not of typenumc.Matrix.ValueErrorifaandbdo not have the same dimensions.
- Throwing errors:
a - b: Element-wise subtraction ofaandb. Returns anumc.Matrixobject.- Throwing errors:
TypeErrorifbis not of typenumc.Matrix.ValueErrorifaandbdo not have the same dimensions.
- Throwing errors:
a * b: Matrix multiplication ofaandb. Returns anumc.Matrixobject. Remember that this is a matrix multiplication, not an element-wise multiplication.- Throwing errors:
TypeErrorifbis not of typenumc.MatrixValueErrorifa’s number of columns is not equal tob’s number of rows.
- Throwing errors:
-a: Element-wise negation ofa. Returns anumc.Matrixobject.abs(a): Element-wise absolute value ofa. Returns anumc.Matrixobject.a ** pow: Raiseato thepowth power.ato the 0th power is the identity matrix (1 on the top left to bottom right diagonal and 0 everywhere else). Returns anumc.Matrixobject. This operator is defined in terms of matrix multiplication, not element-wise multiplication.- Throwing errors:
TypeErrorifpowis not an integer.ValueErrorifais not a square matrix or ifpowis negative.
- Throwing errors:
Please note that for all these operations above, you must never directly modify the matrix that you pass in. You always make a new numc.Matrix object to hold your result, so make sure you set the shape attribute of the new numc.Matrix. You can use Matrix61c_new to create new numc.Matrix objects. For your convenience, here’s an example of how you create a numc.Matrix.
/* Assume new_mat is a matrix struct */
Matrix61c *rv = (Matrix61c *) Matrix61c_new(&Matrix61cType, NULL, NULL);
rv->mat = new_mat;
/* Set the shape of this numc.Matrix */
rv->shape = ...;
For all the functions above, throw a runtime error if any error occurs (such as matrix allocation failure) and causes the operation to fail. Moreover, for any operations that involve two instances of numc.Matrix, you will have to make sure that the second instance b is indeed of type numc.Matrix as we do not support operations between numc.Matrix and other data/object types. Please read the comments in numc.c carefully.
Here is a table that tells you which function in numc.c in which you will implement each of the above operators
| Operator | Function |
|---|---|
| + | Matrix61c_add |
| - (subtraction) | Matrix61c_sub |
| * | Matrix61c_multiply |
| - (negation) | Matrix61c_neg |
| abs() | Matrix61c_abs |
| ** | Matrix61c_pow |
All these functions will be called through a Python-C interface after you complete the numc module. In other words, these are the functions that will be called when you do matrix operations with numc.Matrix objects, and these interface methods will call matrix.c methods that you just implemented. You will have to check for the validity of the dimensions before actually carrying out the arithmetic, and throw an error if needed. Specifically, throw a value error if the arguments’ dimensions are invalid, and a runtime error if any memory allocation fails during execution. Again, depending on your implementation, these error checks could either be in matrix.c or numc.c
After you implement all the functions above, you will need to fill out the struct Matrix61c_as_number, which is used to define the object type numc.Matrix.
Here is the link to the official documentation of a PyNumberMethods struct: https://docs.python.org/3/c-api/typeobj.html#c.PyNumberMethods
Instance Methods
You will implement two instance methods for numc.Matrix:
set(self, i, j, val): Setself’s entry at theith row andjth column toval.- Throwing errors:
TypeErrorif the number of arguments parsed from args is not 3, ifiandjare not integers, or ifvalis not a float or int.IndexErrorifiorjor both are out of range.
- Throwing errors:
get(self, i, j): Returns the entry at theith row andjth column. Throw a type error if the number of arguments parsed from args is not 2 or if the arguments are of the wrong types. Throw an index error if eitheri,j, or both are out of range. Return value is a Python float.- Throwing errors:
TypeErrorif the number of arguments parsed from args is not 2 or if eitheriorjis not an integer.IndexErrorifiorjor both are out of range.
- Throwing errors:
These functions will call get and set in matrix.c to actually get or set the value. Again, you can throw errors either in numc.c or matrix.c.
Here is a table that tells you which functions in numc.c in which you will implement each of the above instance methods
| Python method | C Function |
|---|---|
set | Matrix61c_set_value |
get | Matrix61c_get_value |
After you implement all the functions above, you will need to fill out the array of PyMethodDef structs Matrix61c_methods, which is used to define the object type numc.Matrix.
This link tells you what goes into a PyMethodDef struct: https://docs.python.org/3/c-api/structures.html
Indexing
After finishing this part, you should be able to index into a matrix and change either the value of one single entry or a slice. You will need to complete the following two functions:
static PyObject *Matrix61c_subscript(Matrix61c *self, PyObject *key)This function takes in a
numcmatrix and the key to index into the matrix. For a 2D matrix, the key could either be an integer, a single slice, or a tuple of two slices/ints. For a 1D matrix, the key could either be an integer or a single slice. Below we provide an example for each case.>>> import numc as nc
CS61C Fall 2020 Project 4: numc imported!
>>> a = nc.Matrix(3, 3)
>>> a[0] # Key is a single number
[0.0, 0.0, 0.0]
>>> a[0:2] # key is a single slice
[[0.0, 0.0, 0.0], [0.0, 0.0, 0.0]]
>>> a[0:2, 0:2] # key is a tuple of two slices
[[0.0, 0.0], [0.0, 0.0]]
>>> a[0:2, 0] # key is a tuple of (slice, int)
[0.0, 0.0]
>>> a[0, 0:2] # key is a tuple of (int, slice)
[0.0, 0.0]
>>> a[0, 0] # key is a tuple of (int, int)
0.0
>>> b = nc.Matrix(1, 3) # b is a 1D matrix
>>> b[0]
0.0
>>> b[0:2] # Number of rows/cols does not matter now. You are slicing it as if it were a list
[0.0, 0.0]
>>> b[0:1, 0:1] # This is invalid!
Traceback (most recent call last):
File "<stdin>", line 1, in <module>
TypeError: 1D matrices only support single slice!This function returns a single number if the resulting slice is 1 by 1, otherwise it returns a new matrix that shares its data with its parent matrix. Here are more examples.
  >>> import numc as nc
  CS61C Fall 2020 Project 4: numc imported!
  >>> a = nc.Matrix(3, 3)
  >>> a[0][1]
  0.0
  >>> a[0:1, 0:1]
  0.0
When the target matrix is 1D, then it does not matter whether it has 0 row or 0 column when you are indexing it. If
keyis an integer, thenmat[key]should return thekeyth element of the matrix. Ifkeyis a single slice withstartandstop, thenmat[start:stop]should return another 1D matrix withstop - startelements. For example>>> import numc as nc
CS61C Fall 2020 Project 4: numc imported!
>>> a = nc.Matrix(3, 1, [1, 2, 3])
>>> a[0]
1.0
>>> b = nc.Matrix(1, 3, [1, 2, 3])
>>> b[0]
1.0
>>> a[1:3]
[2.0, 3.0]
>>> b[1:3]
[2.0, 3.0]Throwing errors:
If matrix is 2D,
TypeErrorifkeyis not an integer, a slice, or a length-2 tuple of slices/ints. If matrix is 1D,TypeErrorifkeyis not an integer or a slice.ValueErrorifkeyis a slice or a tuple that has one or more slices, and that at least one of these slices has step size not equal to 1, or if the length of slice is < 1. Here we provide an example for each error case to help you better understand them.>>> import numc as nc
CS61C Fall 2020 Project 4: numc imported!
>>> a = nc.Matrix(4, 4)
>>> a[0:4:2] # Step size != 1
Traceback (most recent call last):
File "<stdin>", line 1, in <module>
ValueError: Slice info not valid!
>>> a[0:0] # Slice has length < 1
Traceback (most recent call last):
File "<stdin>", line 1, in <module>
ValueError: Slice info not valid!IndexErrorifkeyis an integer but is out of range, or ifkeyis a tuple with at least one integer in it, and the integer is out of range.
static int Matrix61c_set_subscript(Matrix61c *self, PyObject *key, PyObject *v)This function takes in a
numcmatrix, the keykeyto index into the matrix, and the valuevto which to set the new slice. Again, the key could either be an integer, a single slice, or a tuple of two slices/ints. If the resulting slice after indexing is 1 by 1, thenvshould be an integer or a float. If it is an 1D matrix (1 by n or n by 1), thenvshould be a list of numbers, and each number can either be int or float, and the length of the list should be the same as the number of elements of this slice. If it is 2D, thenvshould be a 2D list where the ith element of this list is a 1D list of integers/floats to set the ith row of the slice. Below we provide an example for each case.>>> import numc as nc
CS61C Fall 2020 Project 4: numc imported!
>>> a = nc.Matrix(3, 3)
>>> a[0:1, 0:1] = 0.0 # Resulting slice is 1 by 1
>>> a[:, 0] = [1, 1, 1] # Resulting slice is 1D
>>> a
[[1.0, 0.0, 0.0], [1.0, 0.0, 0.0], [1.0, 0.0, 0.0]]
>>> a[0, :] = [2, 2, 2] # Resulting slice is 1D
>>> a
[[2.0, 2.0, 2.0], [1.0, 0.0, 0.0], [1.0, 0.0, 0.0]]
>>> a[0:2, 0:2] = [[1, 2], [3, 4]] # Resulting slice is 2D
>>> a
[[1.0, 2.0, 2.0], [3.0, 4.0, 0.0], [1.0, 0.0, 0.0]]Throwing errors: In addition to the errors you have to throw for invalid key types/values (see
Matrix61c_subscript), you will also have to throwTypeErrorif- Resulting slice is 1 by 1, but
vis not a float or int. - Resulting slice is not 1 by 1, but
vis not a list.
- Resulting slice is 1 by 1, but
ValueErrorif- Resulting slice is 1D, but
vhas the wrong length, or if any element ofvis not a float or int. - Resulting slice is 2D, but
vhas the wrong length, or if any element ofvhas the wrong length, or if any element of an element ofvis not a float or int.
- Resulting slice is 1D, but
We suggest that you use PySlice_GetIndicesEx to extract the slices’ information. Here is the link to the documentation of this function. Moreover, you should note that slices share data with their original matrix. This means that by changing values of the slices, the values of the original matrices should also change. Here are some examples.
>>> import numc as nc
CS61C Fall 2020 Project 4: numc imported!
>>> a = nc.Matrix(2, 2)
>>> a[0:1, 0:1] = 1.0
>>> a
[[1.0, 0.0], [0.0, 0.0]]
>>> a[1] = [2, 2]
>>> a
[[1.0, 0.0], [2.0, 2.0]]
>>> b = a[1]
>>> b[1] = 3
>>> a
[[1.0, 0.0], [2.0, 3.0]]
Also note that it is possible to have nested slices, and changing the nested slices’ data should also change the original matrices’ data. For example,
>>> import numc as nc
CS61C Fall 2020 Project 4: numc imported!
>>> a = nc.Matrix(4, 4)
>>> b = a[0:3, 0:3]
>>> c = b[1:3, 1:3]
>>> c[0] = [2, 2] # Changing c should change both a and b
>>> c
[[2.0, 2.0], [0.0, 0.0]]
>>> b
[[0.0, 0.0, 0.0], [0.0, 2.0, 2.0], [0.0, 0.0, 0.0]]
>>> a
[[0.0, 0.0, 0.0, 0.0], [0.0, 2.0, 2.0, 0.0], [0.0, 0.0, 0.0, 0.0], [0.0, 0.0, 0.0, 0.0]]
Now, if you didn’t fully understand what the deallocate function is supposed to do when you were implementation task 1, it is now a good time to go back and take another look at it.
Again, make sure to set the shape attribute of the new slice that you make!
Testing
Refer to this section for instructions on how to test your program.
How to Debug
To debug the Python-C interface, we suggest that you write your test files in Python, and use gdb or both gdb and pdb to debug.
Using only gdb
You don’t have to use pdb if you do not wish to set breakpoints in your Python test file. Open your terminal and run
Then you can set breakpoints in your C files using the normal gdb commands. gdb will warn you with
No source file named {your c file}
Make breakpoint pending on future shared library load? (y or [n])
Press ‘y’ (without the quotes) to proceed.
After that, you can run run {your python test file name}.py in gdb, and gdb will break at the breakpoints that you just set.
Using both gdb and pdb
You will have to use pdb if you wish to set breakpoints in your Python file. Here’s how it works. Start gdb by running
and set your breakpoints in C (see previous section). Then you will need to run in gdb
run -m pdb {your python file}.py
After this step, you can set breakpoints in your Python file using gdb syntax (for example, b test.py:5). With this approach, your debugger will switch between pdb and gdb depending on whether you are stepping through a Python file or a C file.
Task 4: Speeding up matrix operations
Now that you have completed the three steps above and successfully installed your naive version of numc, it’s time to speed up your matrix functions in matrix.c! As of now, we are only testing PERFORMANCE on non-slice matrices. Although we ARE testing the correctness of matrix operations on matrix slices. Below we outline some steps for boosting performance.
Step 1: Unrolling and Other Optimizations
You should first try to speed up the computation by trying to apply conventional code optimizations (i.e. without using SSE or OpenMP). While we won’t tell you the exact steps, here are some hints that should help you get started:
- Function calls are expensive since they involve setting up a stack frame and jumping to a different part of code. See if there are any functions that are frequently called that don’t necessarily need to be.
- Are there any places where you could do manual loop unrolling?
- Is there any unnecessary computation being done?
Note that the above hints relate to general optimization practices. You do not necessarily need to do all of these to achieve a good speedup.
Once you have improved performance using these optimizations, you can start applying vectorization and parallelization to make the program even faster. Note that you have considerable freedom to apply any of these optimizations, and there is more than one correct solution. Try to experiment with different approaches and see which one gives you the best performance.
Step 2: SIMD Instructions
From lectures, you learned how to apply SIMD instructions to improve performance. The processors in the hive machines support the Intel AVX extensions, which allow you to do SIMD operations on 256 bit values (not just 128 bit, as we have seen in the lab). You should use these extensions to perform four operations in parallel (since all floating point numbers are doubles, which are 64 bit in size). If you are unfamiliar with SIMD instructions, lab 9 can be a good warmup.
As a reminder, you can use the Intel Intrinsics Guide as a reference to look up the relevant instructions. You will have to use the __m256d type to hold 4 doubles in a YMM register, and then use the _mm256_* intrinsics to operate on them.
Here is a list of AVX instructions that you may find helpful, although you are also allowed to use other AVX instructions not on the list.
void _mm256_storeu_pd (double * mem_addr, __m256d a)
__m256d _mm256_set1_pd (double a)
__m256d _mm256_set_pd (double e3, double e2, double e1, double e0)
__m256d _mm256_loadu_pd (double const * mem_addr)
__m256d _mm256_add_pd (__m256d a, __m256d b)
__m256d _mm256_sub_pd (__m256d a, __m256d b)
__m256d _mm256_fmadd_pd (__m256d a, __m256d b, __m256d c)
__m256d _mm256_mul_pd (__m256d a, __m256d b)
__m256d _mm256_cmp_pd (__m256d a, __m256d b, const int imm8)
__m256d _mm256_and_pd (__m256d a, __m256d b)
__m256d _mm256_max_pd (__m256d a, __m256d b)
Step 3: OpenMP
Finally you should use OpenMP to parallelize computation. Note that you will need to make sure that none of the different threads overwrites each others’ data. Just adding a #pragma omp parallel for may cause errors.
Note that the Hive machines have 4 cores with two hyperthreads each. This means that you should expect a speed-up of 4-8x (note that hyperthreads mean that two different threads execute on the same physical core at the same time; they will therefore compete for processor resources, and as a result, you will not get the same performance as if you were running on two completely separate cores).
Task 5: Tell us what you did!
Write up what you did in your README.md! While we do not have a specific format we are looking for, you should discuss what you did as a whole, the different python functions you implemented, what performance improvements you had, what were you surprised about, etc. More specifically, we want you to document your numc module and provide example usages. We expect a minimum of 6000 characters. This may seem like a lot, but documenting you’ve done actually takes quite a number of words, so just sufficiently covering all the things you did in the project should get you to the word count requirement. Again, failure to complete this task may result in negative points, so make sure you do it or you will lose points!
Testing
We will not be grading your tests but we will NOT help you debug unless you have written a test which shows how your code is failing. This means just using the autograder to figure out your issues will not be acceptable for office hours.
We use unittest as the framework for testing and have provided a unittests folder that contains this framework for testing your python module. You should be familiar with unittest by now as you have had experience with it in project 2. Here is the official documentation for the standard Python unittest library. unittests/unittests.py contains all the skeleton code for both correctness and performance tests, and unittests/utils.py has all the functions that you might need in order to write tests. We have provided some sample tests for you, but it is up to you to design and code up the tests. We will not be grading your tests.
As mentioned in Tips and Guidelines and Getting Started, we have installed the naive solution which we will be comparing against on hive! The python package is called dumbpy and you can import it like any other python library (so long as you are on hive)! Please note we will not be distributing this binary which means you must work on hive if you want to test with it. You should use this and the time package to determine how much you sped up your code.
Functions in unittests/utils.py
- `dp_nc_matrix(*args, kwargs)`**
This function will return a
dumbpymatrix and anumcmatrix that are identical.*argsand**kwargswill be used as the arguments to instantiate both matrices in the exact same format as you would instantiate anumc.Matrix. We provide some examples below.>>> dp_mat, nc_mat = dp_nc_matrix(2, 2, 0)
>>> dp_mat
[[0.0, 0.0], [0.0, 0.0]]
>>> nc_mat
[[0.0, 0.0], [0.0, 0.0]]
>>> dp_mat, nc_mat = dp_nc_matrix([[1, 2, 3]])
>>> dp_mat
[[1.0, 2.0, 3.0]]
>>> nc_mat
[[1.0, 2.0, 3.0]]
rand_dp_nc_matrix(rows, cols, seed=0)This function will instantiate a random
dumbpymatrix and a randomnumcmatrix withseed. The two matrices are identical withrowsrows andcols.seedis defaulted to 0.>>>> dp_mat, nc_mat = rand_dp_nc_matrix(2, 2, seed=5)
>>> dp_mat
[[0.27474559623503386, 0.046467764790387715], [0.9927552244592249, 0.08003044504673706]]
>>> nc_mat
[[0.27474559623503386, 0.046467764790387715], [0.9927552244592249, 0.08003044504673706]]
cmp_dp_nc_matrix(dp_mat: dp.Matrix, nc_mat: nc.Matrix)- This function will return True if
dp_mathas the same size ofnc_matand all corresponding elements are equal (within a margin of error).
- This function will return True if
compute(dp_mat_lst: List[Union[dp.Matrix, int]], nc_mat_lst: List[Union[nc.Matrix, int]], op: str)- This function takes in a list of dumbpy matrices and a list of numc matrices, then applies the specified operation
opon these matrices. Note thatopis a string."add","sub","mul","neg","abs", and"pow"correspond to the operations+,-(subtraction),*,-(negation), andabs, respectively. This function will return whether the computeddumbpymatrix is equal to the computednumcmatrix, as well as the speedup for this specific computation.- For unary operations like
"neg"and"abs", each matrix list must only contain 1 matrix. For the binary operations, they must contain more than 1 matrix. - Note that to compute
"pow",dp_mat_lstandnc_mat_lstshould look like something like[Matrix(2, 2), 1]. - You can also do chained operations like
compute([a, b, c], [d, e, f], "add")wherea, b, c, d, e, fare matrices, and the function will computea + b + candd + e + f.
- For unary operations like
- This function takes in a list of dumbpy matrices and a list of numc matrices, then applies the specified operation
More about unittest
Running
$ python -m unittest unittests.py -vwill run all tests in
unittests.py.If you only want to run tests of one particular class, run
$ python -m unittest unittests.{classname} -vFor example, running
$ python -m unittest unittests.TestAdd -vwill only run the tests under the
TestAddclass.If you want to run a specific test under a specific class, run
$ python -m unittest unittests.{classname}.{testname} -vFor example, running
$ python -m unittest unittests.TestAdd.test_small_add -vwill only run the
test_small_addtest.
Frequently Asked Questions
Task 1
Q 1.1: Will we be graded on what types of errors we threw? Or do we just have to throw some error?
A 1.1: Yes we expect you to throw the correct error types. We do not care about the error messages tho.Q 1.2: I’m getting this when I run
make test, what is happening?rm -f test
gcc -g -Wall -std=c99 -fopenmp -mavx -mfma -pthread -O3 mat_test.c matrix.c -o test -fopenmp -L/home/ff/cs61c/cunit/install/lib -I/home/ff/cs61c/cunit/install/include -lcunit -I/usr/include/python3.6 -lpython3.6m
./test
CUnit - A unit testing framework for C - Version 2.1-2
http://cunit.sourceforge.net/
Makefile:25: recipe for target 'test' failed
make: *** [test] Illegal instruction (core dumped)A 1.2: This means your code segfaulted before any assert statements was reached and none of the tests passed. Use gdb to locate your bug.
- Q 1.3: Do we assume rows and cols start at 1 or 0?
A 1.3: They are both zero-indexed. - Q 1.4: Do our functions need to support self-referential operations? For example,
mul_matrix(mat, mat, mat).
A 1.4: No. - Q 1.5: Is it reasonable to run valgrind on
./test? A 1.5: You can try, but would not recommend. Setting up valgrind for C-Python interface can be difficult. - Q 1.6: When we throw an error, is it just a fprintf call to stderr?
A 1.6: Nope, you should throw errors in a python context. i.e., when your python code calls this underlying C function, it should error. Take a look at the Python/C API’s reference manual for exception handling. - Q 1.7: Can we make a slice on slice? for example,
mat1 = [[1,2,3],[4,5,6]],mat2 = mat1[0]. Can we domat3 = mat2[0]?
A 1.7: You can make a slice on a 2D slice, but a “slice” on a 1D slice is just a number and is pass by value. In this case,mat3will just be a number and changing its value will not changemat2. - Q 1.8: Does our solution need to exactly match the reference?
A 1.8: No, we allow an error margin of 1e-6.
Task 2
- Q 2.1: I’m getting undefined symbols upon import (for example,
undefined symbol: allocate_matrix_ref). What is happening?
A 2.1: Think about what files your module needs, especially where the undefined symbol is located. - Q 2.2: The values in my matrices change after I print their slices.
A 2.2: This is likely a memory leak. Double check yourdeallocate_matriximplementation. What happens when you callprint(mat[0])is that it will create a slice, then immediately deallocate it after this line.
Task 3
- Q 3.1: Getting
<class 'AttributeError'> -- shape.
A 3.1: Make sure the relevant method in numc.c is settingmat->shape - Q 3.2: Getting
<class 'SystemError'> -- <built-in method set of numc.Matrix object at 0x7f175faffef0> returned NULL without setting an error!
A 3.2: You need to throw an error before returningNULLin any interface function. - Q 3.3:
UnicodeDecodeError: ‘utf-8’ codec can't decode byte 0x89 in position 5: invalid start byteupon import. What’s wrong?
A 3.3:{NULL, NULL, 0, NULL}from starter code must be last element ofMatrix61c_methods, so make sure you don’t accidentally remove that! - Q 3.4: Are we allowed to call methods we wrote in
matrix.c?
A 3.4: Yes please do! - Q 3.5: How do we know what gets passed into
PyObject* args?
A 3.5: Read the official documentation! (You can also take a look at the starter code for examples.)
Task 4
Q 4.1:
#pragma omp parallel forabove a simple for loop slows down my add_matrix drastically?
A 4.1: You need big matrices to actually see the effect of speedup (something around 1000 * 1000).Q 4.2: I’m getting
warning: ignoring #pragma omp parallel [-Wunknown-pragmas]but I have not changed the Makefile?
A 4.2: It might be your task 2. Take a look at the compiler and linker flags we provided you.Q 5.1: I’m passing my local correctness tests but failing autograder. What might be the case?
A 5.1: Here are some common sources of bugs. 1. Make sure you test your matrix operations on non-integer floating point values (such as 1.2, 1.3). In the past semester, some students’ code was only able to generate correct results when every floating point value in their matrices were integer-valued floating points (such as 1.0, 2.0). 2. Make sure you are setting theshapeattribute of every returned matrix! 3. Please do NOT modify anything related to generating random matrices! Do NOT try to speed them up! We use those to generate matrices to test on the autograder. We don’t include the time for generating matrices when testing for performance.Q 5.2: Performance tests are failing but correctness tests all pass.
A 5.2: Our performance tests test on much larger matrices than the correctness tests, so make sure you handle those cases correctly!Q 5.3: Failing tests that are related to throwing errors.
A 5.3: Make sure you are throwing the correct type of error, not just any error.
Grading
The grading breakdown for Project 4 is as follows:
- Correctness: 55%
- Speedup: 40%
- Multiplication: 20%
- Power: 25%
- Simple: 12.5%
- Comprehensive: 42.5%
- README.md: 5%
Here are the graphs for the speedup tests. The x-axis is your speedup times and the y-axis indicates what percentage of that test’s total score you will receive.
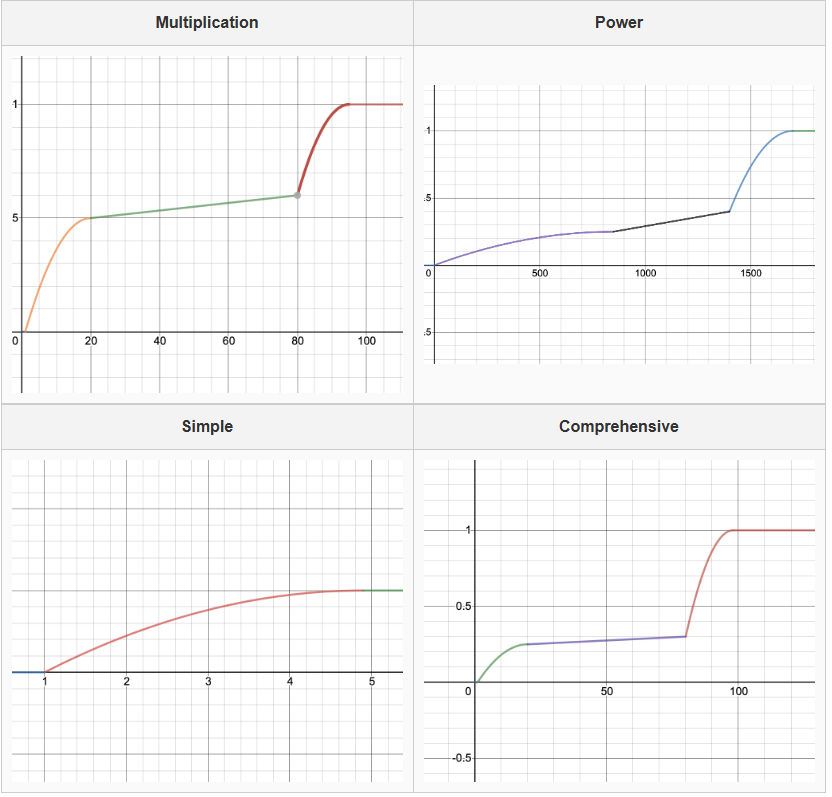 Minimum speedup for 100% on each test:
- Multiplication: 95x
- Power: 1700x
- Simple: 4.9x
- Comprehensive: 98x
Since we are running your submissions on hive, albeit reserved, speedup times may fluctuate a bit. You should try to go above the speedup value as we will rerun the ag after the deadline and your speedup may go up or down. We will not rerun submissions if they went down unless we made another change to the autograder.
We will only be using your matrix.h, matrix.c, numc.c, setup.py, and README.md for grading. Gradescope only shows you all the core correctness tests that are needed to run performance tests. Other tests will stay hidden until the late due date.
Performance Contest
We are doing a performance contest for Project 4 this year! The method in which your Project 4 submission will be scored is based on the performance on your numc module. Note that while all submitted designs will show a score, only submissions that pass 100% of visible and hidden tests will be eligible for the contest. This means that it is in your best interest to test throughly!
We are still determining which benchmark(s) will be used in evaluating your solution and will update the spec once we have finalized that.